5.2.1 Screen management
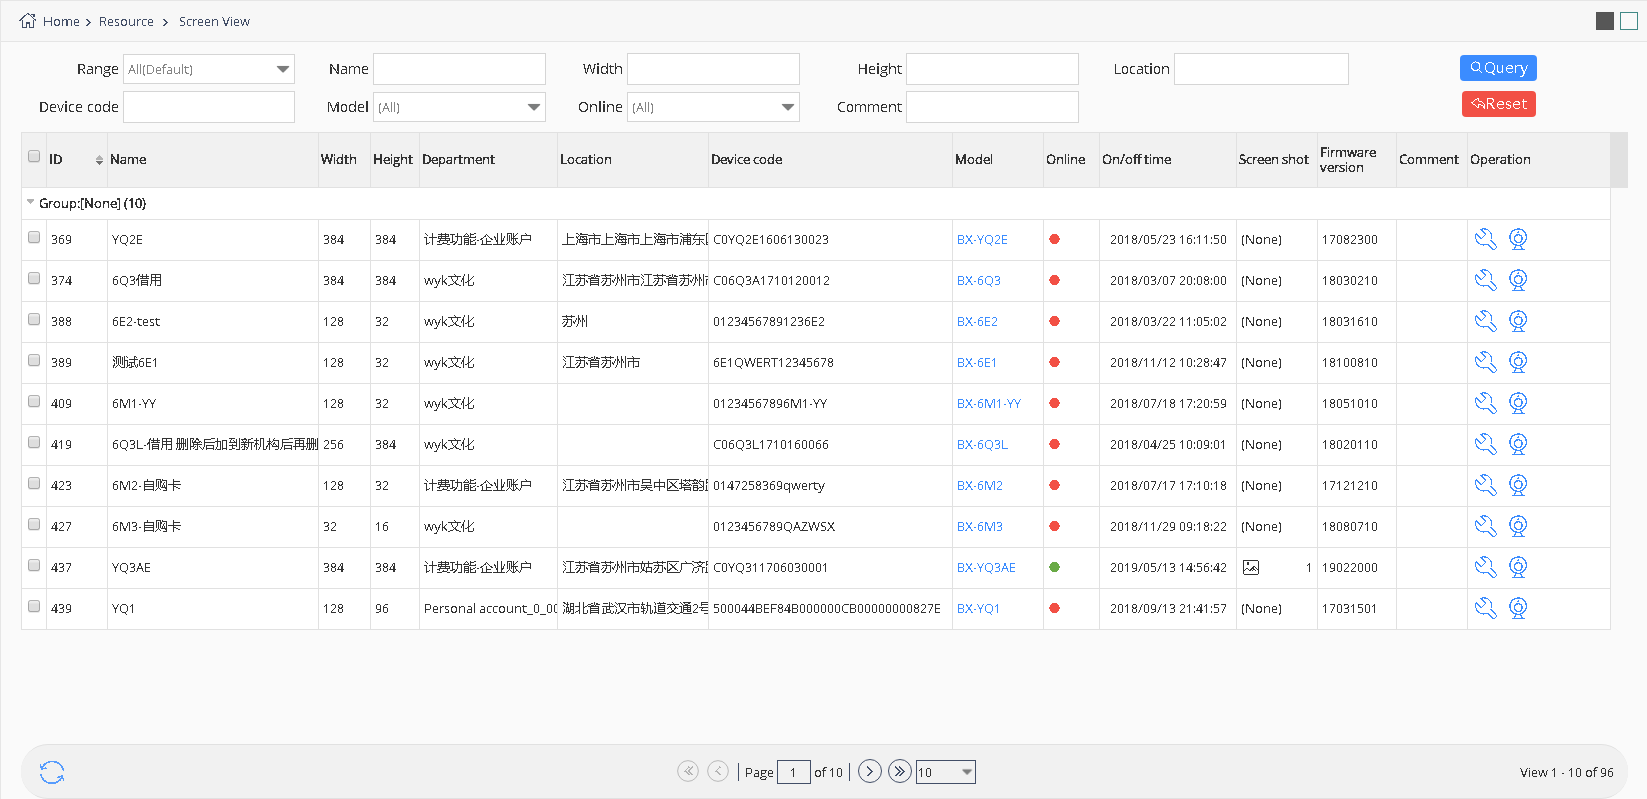
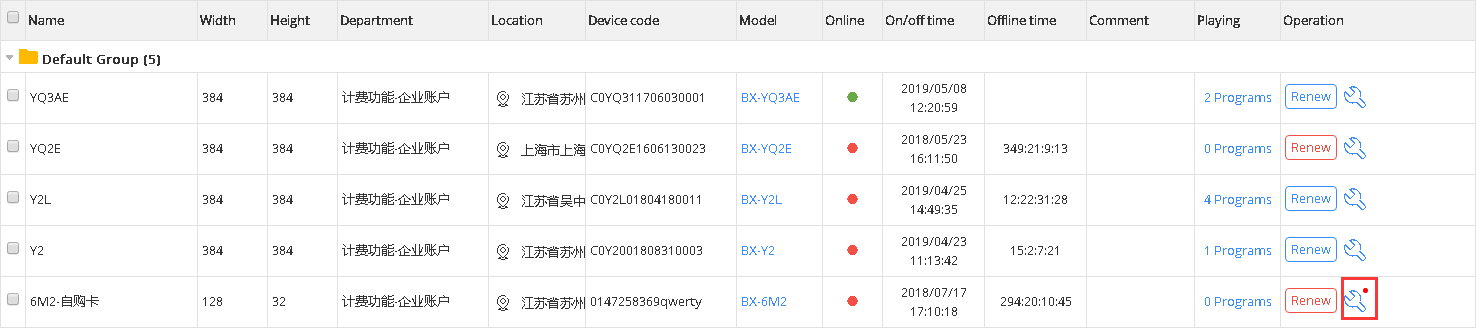
Users can operate the screen by screen management page ,like in the picture 5.2-1 and table 5.2-1
picture 5.2- 1
| Button | Function |
|---|---|
 |
Screen control button ,click into the control page ,set the screen parameters |
 |
Add button, used for add new record |
 |
Delete button ,used for deleting the single or bulk records |
 |
Refresh button ,used for refreshing the list |
 |
Check the button online ,after select the screen ,can check the screen is online or not |
 |
Reset task button ,click to reset the task ,cancel the current task. |
 |
Restart the controller button, used for restart the controller |
 |
Screenshot button ,used for screenshot of the current screen program,now only YQ5E、YQ2A、YQ2AE、YQ3A、YQ3AE and Y series support this function |
 |
Checking and Update button ,used for checking and update the new firmware |
 |
Update firmware button,if have new firmware,select the screen and click it to make updating the screen. |
 |
Screen brightness button,used for changing the screen brightness. |
 |
Screen time correction function, select it can used for controller time correction , it will correct the time to be the same with where the screen is in. |
 |
Power on |
 |
Power off |
 |
Buy button, choice screen then buy the service packages |
 |
Working mode switching button. Users can switch the working mode of YQ5E,YQ2AE and YQ3AE |
table 5.2-1 screen management page button note
5.2.1.1 Add screen
If want to make program,the first step is add screen .pls click the add screen button ,then will display the page like this picture 5.2- 2, input the device code and screen name is ok, but pls make sure the controller is online then can add successfully.
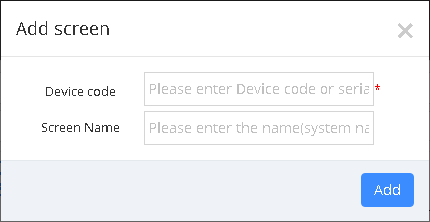
picture 5.2- 2
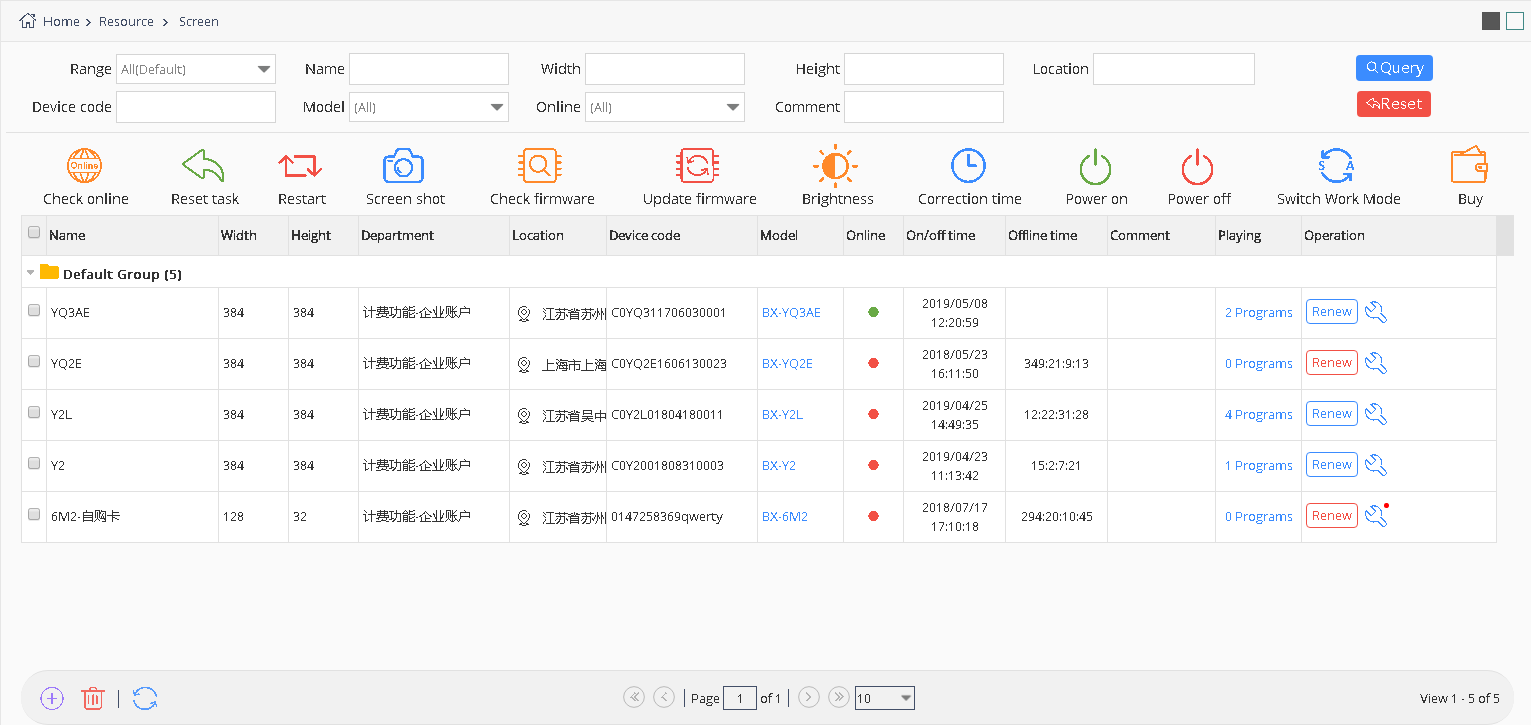
To the YQ controller ,if u set the IP of the user name and name ,then no need to manual add it. It can automatically added to specify user name after the control card is online;On the other hand, you need to manually add, when adding screen, priority recommended used as serial number, bar code identification code for serial Numbers are used if without bar code.For 6Q series controller, currently only support added manually, and can only use the bar code as serial number.After add the screen successfully, relevant information will be displayed on the screen management page, as shown in picture 5.2-3.

picture 5.2- 3
5.2.1.2 Edit screen information
Click the corresponding button of screen settings ,then edit related information, see picture 5.2-4. Users can edit screen group, name , screen type, address, address detail, time zone Location and memo .Users can add location or use the map to add location. When users modify the time and correction the time, the screen time will be the same with where the screen is in.Enterprise Users can use “transfer screen” function.
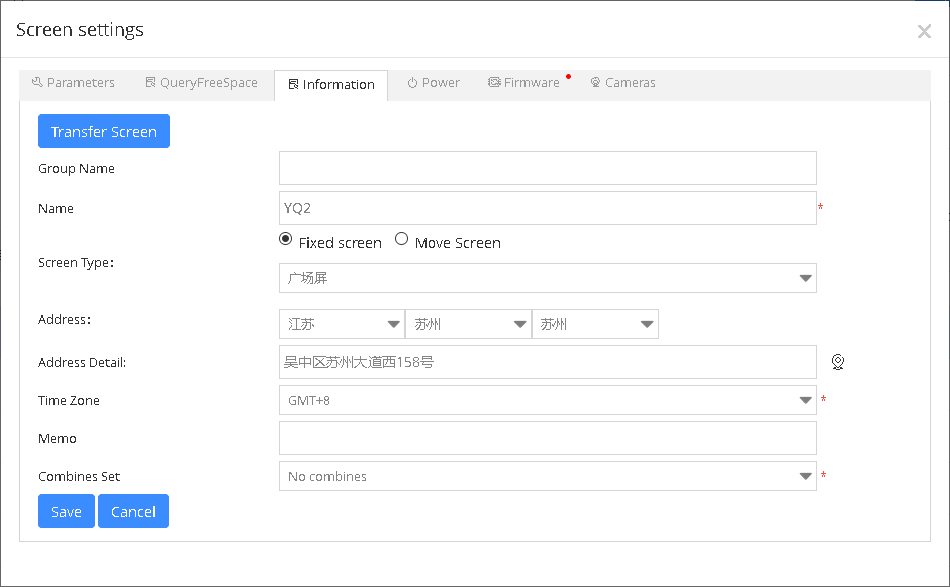
picture 5.2- 4
5.2.1.3 Firmware updating
When the screen need update the firmware, it will show red light on the corresponding control button , as shown in picture 5.2-5.
picture 5.2- 5
When users click the screen controlling button which has red light, it will show the available firmware version which can be updated and corresponding info for the current screen, such as picture 5.2-6, then start of the upgrade, click “update firmware”, after the success of the upgrade, users can check the information in the notice list, as shown in picture 5.2-7.
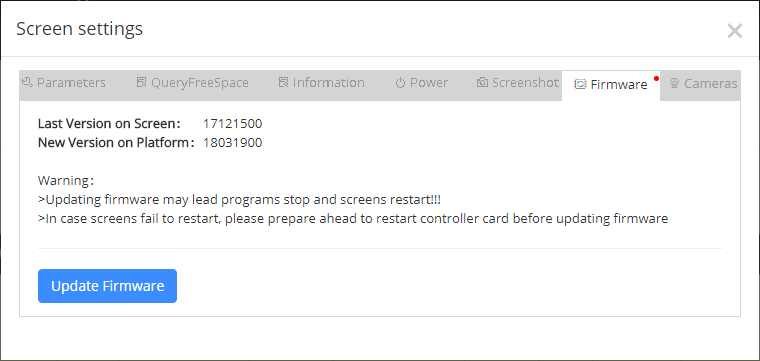
picture 5.2- 6
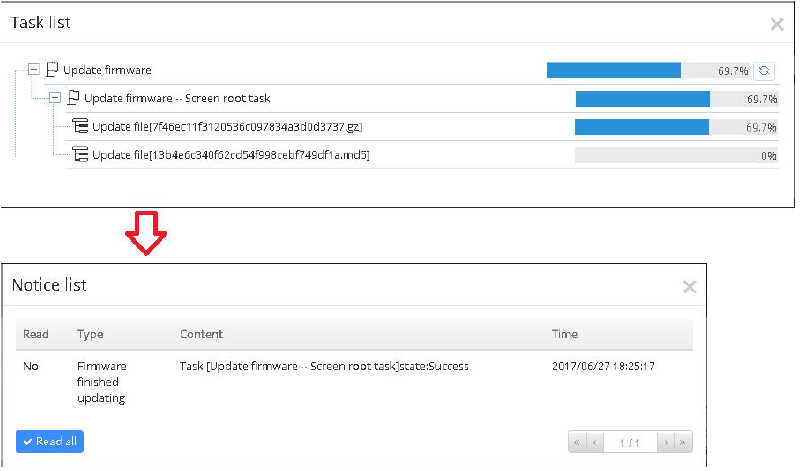
picture 5.2- 7
5.2.1.4 Edit screen parameter
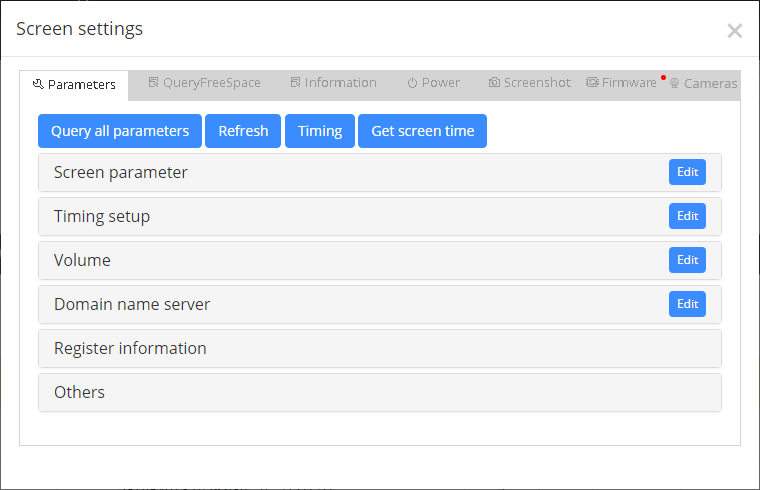
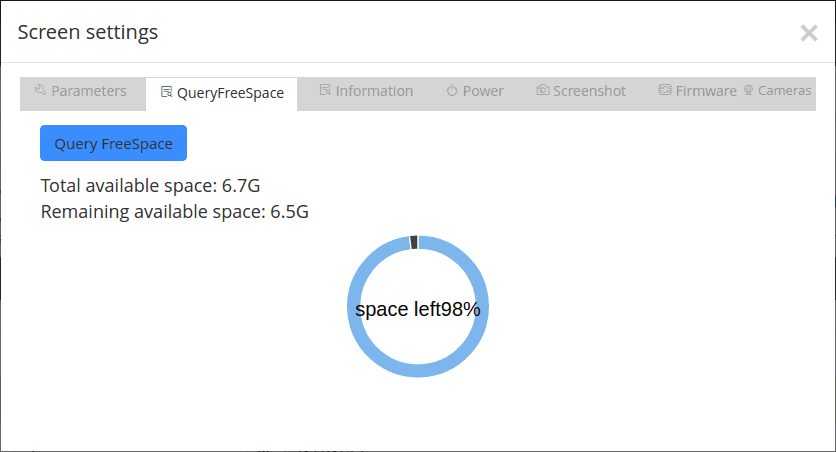
When users click screen management button , “Screen settings” window will appear, see picture 5.2 8. Users can check the rest storage of controller and turn on&off the screen on this window, like picture 5.2-9 and 5.2-10.
picture 5.2- 8
picture 5.2- 9

picture 5.2- 10
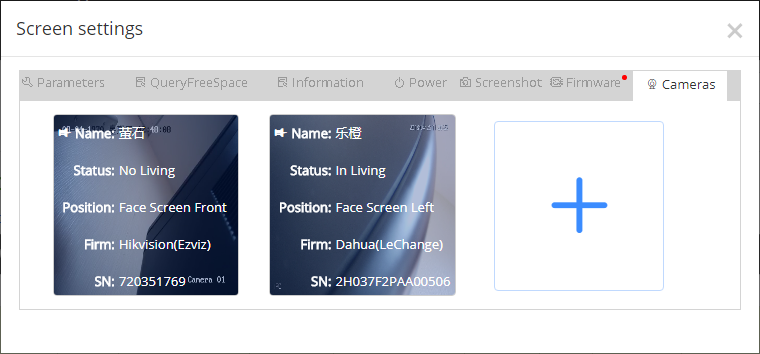
5.2.1.5 Camera function
In addition to set the parameter of the controller, users can also bind the camera to the control card, and use the camera to check the status of the screen in real time. User can click the screen controlling button, then click “Cameras” as to enter the camera management interface, as shown in picture 5.2-11, the platform supports camera Hikvision (ezviz) and Dahua (LeCheng), some function of the buttons on the camera management interface, please refer to table 5.2-2.
picture 5.2- 11
| Button | Function |
|---|---|
 |
Binding button, binding camera |
 |
Remove bind button ,unbind the camera |
 |
Live button ,Start the live show function of the camera |
 |
Stop living button,Stop living show of the camera |
table 5.2-2 camera management page button note
In the camera management interface, click the "+" button, Users can add camera , as shown in picture 5.2-12, users only need to choose the camera manufacturers,fill in the camera's serial number and verification code and other information,then click Save to complete adding camera. Then click on the binding button,when bind the camera successfully , Users can click on the "open live button" then click the image area below the button to display the live interface, as shown in picture 5.2-13. Each time can only watch the live screen of 1 minutes, and the live page will be automatically closed after that.
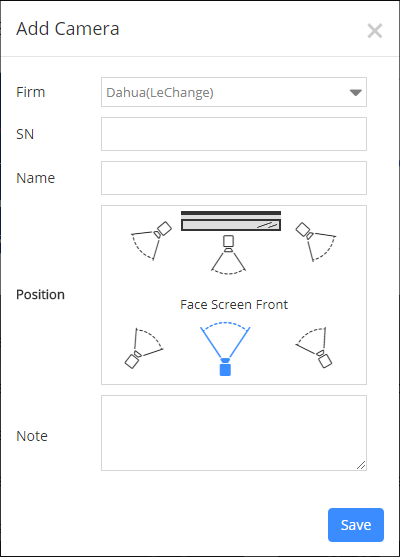
picture 5.2- 12
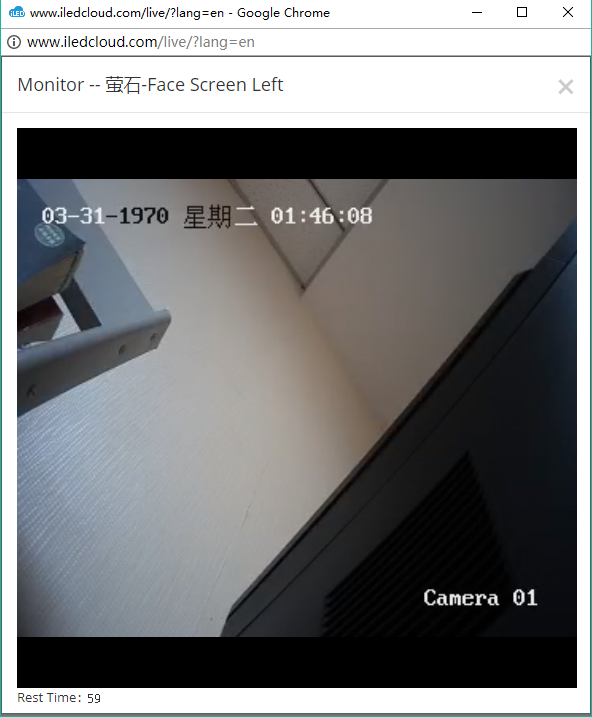
picture 5.2- 13
5.2.1.6 Buy Screen flow package and renewal it
After the user added the screen successfully, users also needs to buy a screen flow package to be used normally. On V1.4.7 version, our platform releases some discount coupons for users, and users can also click on "buy" button in the screen management, or check the required screen, click the purchase button above the page,. When the mouse hovers on the "Buy" button, a suspension frame is popped out to show a brief description of the 2 Flow packages, as shown in picture 5.2-14. The user clicks on "view the details" and the page will jump to the "package and service" page, and the user can see the detailed description of the package.

picture 5.2- 14
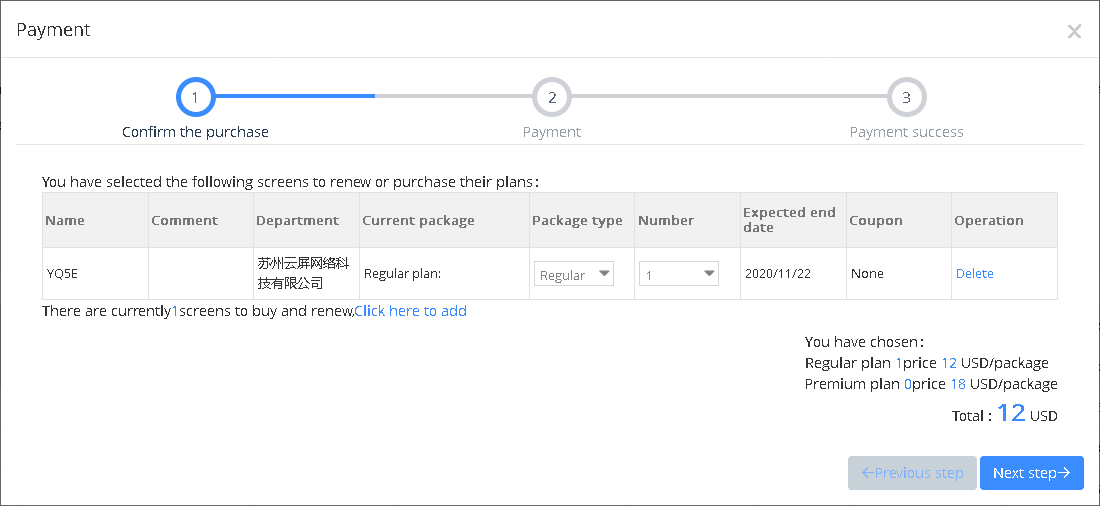
Click buy button ,then will enter into payment process ,in the step of confirm purchase , it will show the purchased flow package details, as shown in picture 5.2-15.In this page, it will show the amount of screens which need to be renewed. When user clicks the link “click here to add”, those screens will be added in current order details to facilitate user purchase.
picture 5.2- 15
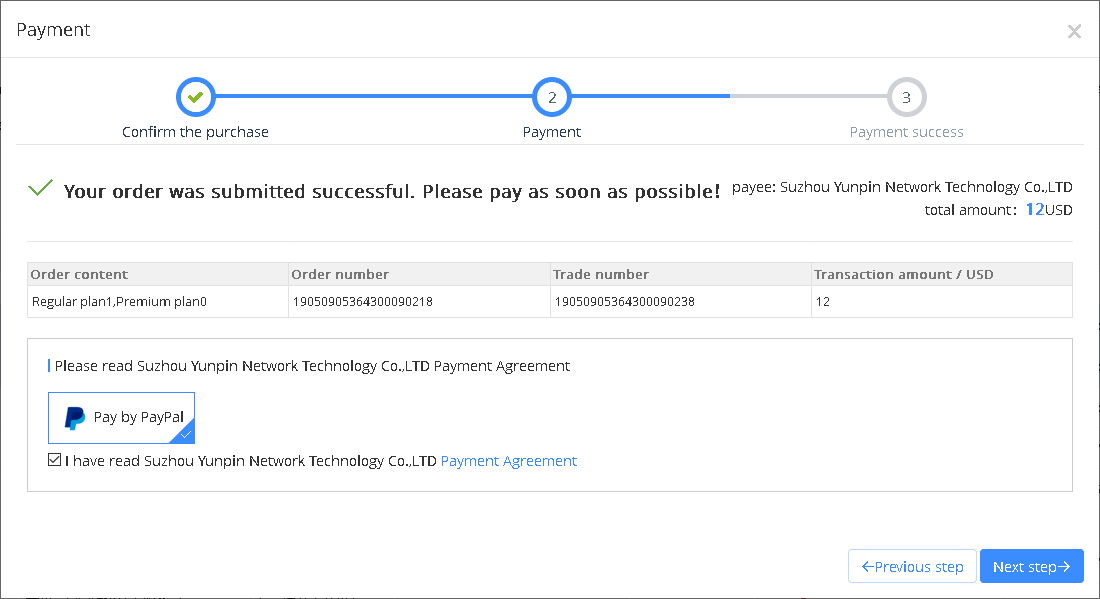
Then click next ,payment interface .The page will display the order information, payment user initiated and the platform of the payment protocol, as shown in picture 5.2-16. Overseas customers can pay by Paypal.
picture 5.2- 16
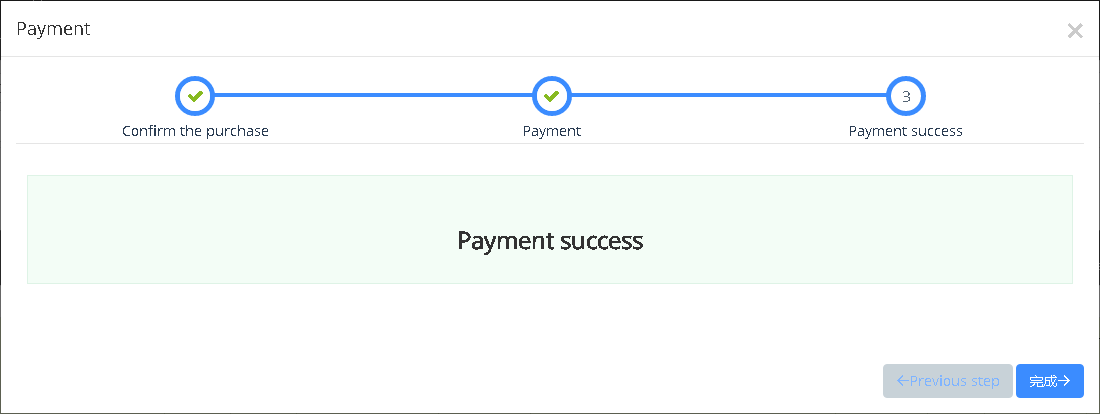
Click next , then enter into PayPal interface ,When paid successfully , a new window will pop up to inform of the successful payment. See picture 5.2-17.Then the screen can be used normally.
picture 5.2- 17
When the screen’s flow package is about to expire, the user can also renewal it by clicking the corresponding screen button such as "renewal" button or click the buy button . Please follow the instruction to finish the renewal or purchase new flow package ,details as shown in picture 5.2-18.

picture 5.2- 18
5.2.1.7 Delete screen
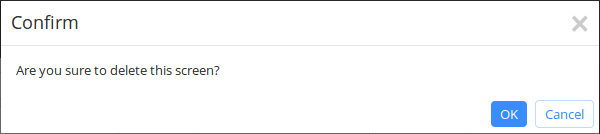
Select the controller which you want to delete, and click “delete” button, like picture 5.2-19.When you delete, it will delete all the data of “add screen automatically” from control cards. After delete the screens from iLEDCloud, what you bought will be always there, later, if you want, you can use again.
picture 5.2- 19
5.2.1.8 Current playing function
Add “check current playing list” function in screen management. Click the corresponding “current playing” link, it will show the current playing list and all programs in, like picture 5.2-20.Users can preview program or view the file size of this playlist on this page too.
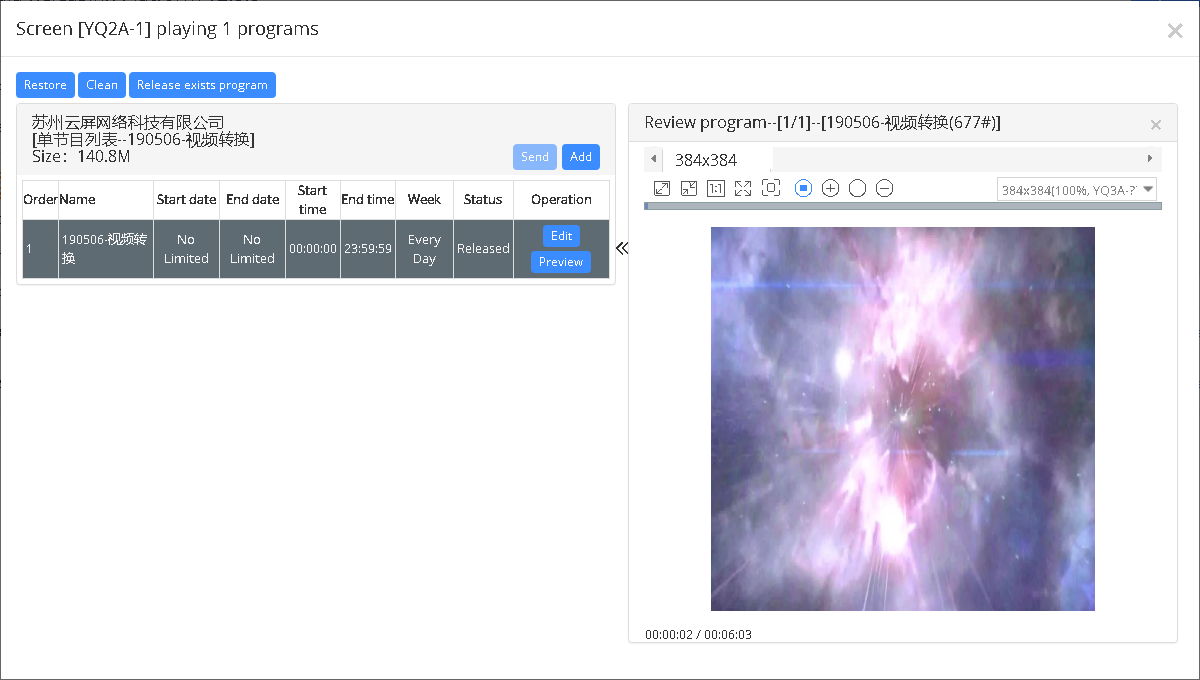
picture 5.2- 20
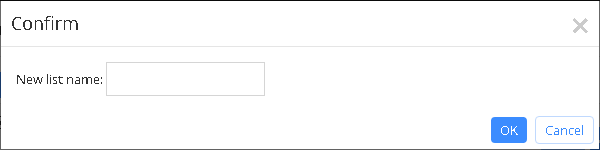
Users can modify, recover and clean the programs in this list. And can also click “add program” button to add program or make a new playing list, and users need to fill in the new name of new playing list, like picture 5.2-21.
picture 5.2- 21
5.2.1.9 Check screen
Please check the below picture 5.2-22.